Chapter 4. Specific Design and Redesign
In chapter 3, I described the general design and redesign of my project. In this chapter I will give more information about the specific design and redesign of my project, mainly concerning on the design materials and the final product of the project. Section 4.1 gives a review on what kind of design materials we used for this project. Section 4.2 offers the detailed introduction of the product.
4.1 Design material and instrument
In my project, the major job is to make a design and redesign of experiment for instructional purpose. Many design materials and instruments could be chosen such as animation, simulation or video and so on. Considering our goal is to examine of the effect of the PI theory in web-learning environment and to prevent split attention, we only use the text media and ignore others. Since our product is also a web-based product, HTML and JavaScript are the best program languages for our choice.
4.1.1 Overview of HTML
What is HTML?
HTML is the lingua franca for publishing hypertext on the World Wide Web. It is a non-proprietary format based upon SGML, and can be created and processed by a wide range of tools, from simple plain text editors - you type it in from scratch- to sophisticated WYSIWYG authoring tools. HTML uses tags such as <h1> and </h1> to structure text into headings, paragraphs, lists, hypertext links etc.
HTML or HyperText Markup Language, is how a web browser displays its multimedia documents. The documents themselves are plain text files (ASCII) with special "tags" or codes that a browser knows how to interpret and display on your screen. [Online available at http://www.mcli.dist.maricopa.edu/tut/tut0.html]
HTML stands for the HyperText Markup Language. HTML is the major language of the Internet's World Wide Web. Web sites and web pages are written in HTML. With HTML and the World Wide Web, you have the ability to bring together text, pictures, sounds, and links... all in one place! HTML files are plain text files, so they can be composed and edited on any type of computer... Windows, Mac, Sun, whatever. [Online available at http://www.davesite.com/webstation/html]
From the above statements, we can see that there is no globe-united definition on HTML, but we can identify at least that HTML stands for the HyperText Markup Language, which is the major language of the Internet’s World Wide Web. In fact, most web-sites and web pages are written in HTML. Since my project is a computer-based experiment designed and redesigned for the web-based learning environment, HTML is apparently the major language for the product.
HTML File
HTML stands for Hyper Text Markup Language
An HTML file is a text file containing small markup tags
The markup tags tell the Web browser how to display the page
An HTML file must have an htm or html file extension
An HTML file can be created using a simple text editor
HTML documents are text files made up of HTML elements.
HTML elements are defined using HTML tags
HTML Tags
HTML tags are used to mark-up HTML elements
HTML tags are surrounded by the two characters < and >
The surrounding characters are called angle brackets
HTML tags normally come in pairs like <b> and </b>
The first tag in a pair is the start tag, the second tag is the end tag
The text between the start and end tags is the element content
HTML tags are not case sensitive, <b> means the same as <B>
HTML Elements
HTML documents are text files made up of HTML elements.
HTML elements are defined using HTML tags.
[Online available at http://www.w3schools.com/html/html_elements.asp]
Just because of using HTML, the design and redesign of the experiment can be built step by step. HTML is not only a web page language but also the basic matrix in which JavaScript language embed.
4.1.2 Brief review of JavaScript
JavaScript is another important program languague for our design and redesign work. It is convenient for the users to create check forms, pop-up windows and so forth.
What is JavaScript?
JavaScript is a compact, object-based scripting language for developing web applications. JavaScript statements can be embedded directly in an HTML page. These statements can recognize and respond to user events such as mouse clicks, form input, and page navigation. For example, you can write a JavaScript function to verify that users enter valid information into a form. Without any network transmission, an HTML page with embedded JavaScript can interpret the entered text and alert the user with a message dialog if the input is invalid. Or you can use JavaScript to perform an action (such as play an audio file, execute an applet, or communicate with a plug-in) in response to the user opening or exiting a page. [Online available at http://www.wdvl.com/authoring/JavaScript]
JavaScript shares the fundamental feature of all programming languages: it can get data from some source, process that data, and output the results. Because it is integrated into HTML, JavaScript already knows what the browser knows, and can figure out how many form elements are on a page or how many frames are in a window. It also knows how to work with this environment, and can perform such tasks as targeting a specific frame for output just as users could target a frame to contain the contents of a hypertext link in HTML. The types of things you can use JavaScript for include controlling a page; opening and closing windows and frames; programmatically accessing the history window (which allows the developer to refer to previously viewed documents) and other browser features.
Furthermore, with JavaScript developer can provide feedback to the user, generate new HTML pages using variable information, and implement user-defined functions. Online available at http://www.webdeveloper.com/javascript/javascript_js_tutorial.html]
Embedding JavaScript
JavaScript code is typically embedded into an HTML document using the SCRIPT tag. You are free to embed as many scripts into a single document as you like, using multiple SCRIPT tags. A script embedded in HTML with the SCRIPT tag uses the format:
   >SCRIPT>
       ……
   >/SCRIPT>
The language attribute is optional, but recommended. You may specify that a section of code only be executed by browsers which support a particular version of JavaScript.
The external file is simply a text file containing JavaScript code, and whose filename ends with the extension ".js". Note that although some version 3 browsers support the SRC attribute, it only functions reliably across platforms in the version 4 browsers.
Scripts can be placed inside comment fields to ensure that the JavaScript code is not displayed by old browsers that do not recognize JavaScript. The markup to begin a comment field is <!-- while you close a comment field using //-->. [Online available at http://www.wdvl.com/Authoring/JavaScript/Tutorial/versions.html]
JavaScript Grammar
JavaScript code, much like other programming languages, is made up of statements, which serve to make assignments, compare values, and execute other sections of code. By and large, programmers will already be familiar with JavaScript's usage of variables, operators, and statements. Below is a chart summarizing the main elements of JavaScript grammar. [Online available at http://www.wdvl.com/Authoring/JavaScript/Tutorial/grammar.html]
Table 5. Elements of JavaScript
|
Variables |
Labels which refer to a changeable value.
Example: total may be possessed a value of 100. |
|
Operators |
Actors which can be used to calculate or compare values.
Example: Two values may be summed using the addition operator (+); total + tax
Example: Two values may be compared using the greater-than operator (>); total>200
|
|
Expressions |
Any combination of variables, operators, and statements which evaluate to some result. In English parlance this might be termed a "sentence" or even a "phrase", in that grammatical elements are combined into a cogent meaning.
Example: total=100;
Example: if (total>100)
|
|
Statements |
As in English, a statement pulls all grammatical elements together into a full thought. JavaScript statements may take the form of conditionals, loops, or object manipulations. It is good form to separate statements by semicolons, although this is only mandatory if multiple statements reside on the same line.
Example: if (total>100) {statements;} else {statements;}
Example: while (clicks<10) {statements;}
|
|
Objects |
Containing constructs, which possess a set of values, each value reflected into an individual property of that object. Objects are a critical concept and feature of JavaScript. A single object may contain many properties, each property, which acts like a variable reflecting a certain value. JavaScript can reference a large number of "built-in" objects, which refer to characteristics of a Web document. For instance, the document object contains properties, which reflect the background color of the current document, its title, and many more. For a fuller explanation of the built-in objects of JavaScript, see the section on "Document Object Model".
|
|
Functions and Methods |
A JavaScript function is quite similar to a "procedure" or "subroutine" in other programming languages. A function is a discrete set of statements, which perform some action. It may accept incoming values (parameters), and it may return an outgoing value.
A function is "called" from a JavaScript statement to perform its duty. A method is simply a function, which is contained in an object. For instance, a function which closes the current window, named close (), is part of the window object; thus, window. close () is known as a method. |
4.1.3 Example of the product made of HTML and JavaScript
The following Figure 20 is one web page, which is developed by HTML and JavaScript, the program is listed in Table 6.
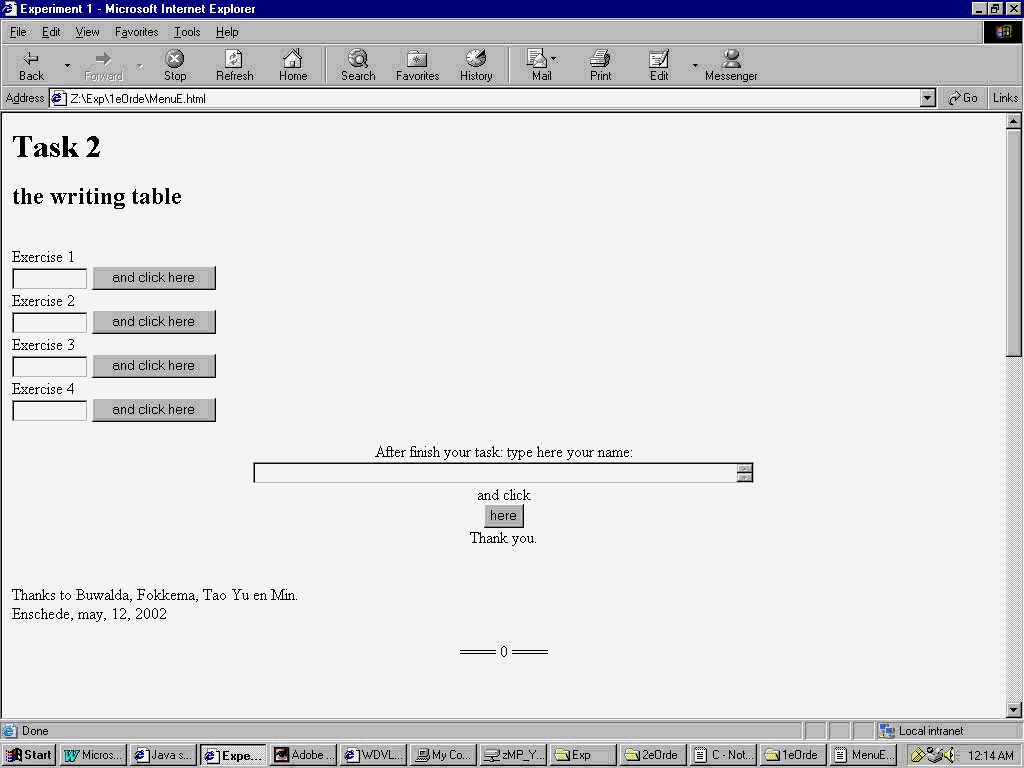
Figure 20. The web-site designed by using HTML and JavaScript. It is a working environment with problems and instructions. First version made by Buwalda and Fokkema (2000). Second version: in English by Tao Yu, Min, Buwalda and Fokkema (2002).
Table 6. Program made of HTML and JavaScript (adapted from Min)
|
<HTML>
<HEAD>
<TITLE>Experiment 1</TITLE>
</HEAD>
<BODY>
<H1>Task 2</H1>
<H2>the writing table</H2>
<FORM METHOD=POST NAME='A8' ACTION="http://www.to.utwente.nl/forms/formsggn.acgi">
<BR>
Exercise 1<BR>
<INPUT TYPE="TEXT" NAME="a1" VALUE="" SIZE="9">
<INPUT TYPE="button" VALUE="and click here" ONCLICK="register1 ()"><BR>
Exercise 2<BR>
<INPUT TYPE="TEXT" NAME="a2" VALUE="" SIZE="9">
<INPUT TYPE="button" VALUE="and click here" ONCLICK="register2 ()"><BR>
Exercise 3<BR>
<INPUT TYPE="TEXT" NAME="a3" VALUE="" SIZE="9">
<INPUT TYPE="button" VALUE="and click here" ONCLICK="register3 ()"><BR>
Exercise 4<BR>
<INPUT TYPE="TEXT" NAME="a4" VALUE="" SIZE="9">
<INPUT TYPE="button" VALUE="and click here" ONCLICK="register4 ()"><BR>
</CENTER>
<p>
<CENTER>
After finish your task: type here your name:
<br><TEXTAREA NAME="Naam" VALUE='xxx' ROWS=1 COLS=60></TEXTAREA>
<br>
and click<BR>
<INPUT type="submit" NAME="*submit_form" VALUE="here">
<INPUT type="hidden" NAME="*mailsubject" VALUE="results-exp1-tsk2">
<INPUT type="hidden" NAME="*mailto" VALUE="Min@edte.utwente.nl">
<INPUT type="hidden" NAME="*mailfrom" VALUE="Min@edte.utwente.nl">
<INPUT type="hidden" NAME="*smtphost" VALUE="mail.to.utwente.nl">
<BR>Thank you.
</CENTER>
<BR>
<BR>
Thanks to Buwalda, Fokkema, Tao Yu en Min.<BR>
Enschede, may, 12, 2002
<BR>
<BR>
<CENTER>
==== 0 ====
</CENTER>
<BR>
<BR>
<BR>
<BR>
<BR>
<BR>
<BR>
<BR>
<BR>
<P>Data:<BR>
<INPUT TYPE="TEXT" NAME="v1" VALUE="gfd" SIZE="70"><BR>
<INPUT TYPE="TEXT" NAME="v2" VALUE="ddf" SIZE="70"><BR>
<INPUT TYPE="TEXT" NAME="v3" VALUE="ddg" SIZE="70"><BR>
<INPUT TYPE="TEXT" NAME="v4" VALUE="gdd" SIZE="70"><BR>
<INPUT TYPE="TEXT" NAME="v5" VALUE="ghh" SIZE="70"><BR>
<INPUT TYPE="TEXT" NAME="v6" VALUE="hhh" SIZE="70"><BR>
<INPUT TYPE="TEXT" NAME="v7" VALUE="hgh" SIZE="70"><BR>
<INPUT TYPE="TEXT" NAME="v8" VALUE="fgg" SIZE="70"><BR>
Last: <INPUT TYPE="text" NAME="tijdregel" VALUE="00:00:00" SIZE=70 ><P>
Slot: <INPUT TYPE="TEXT" NAME="Send" VALUE="fgg" SIZE="70"><BR>
<P>
Check table:<BR>
Task 1: <INPUT TYPE="TEXT" NAME="cc1" VALUE="" SIZE="70"><BR>
Task 2: <INPUT TYPE="TEXT" NAME="cc2" VALUE="" SIZE="70"><BR>
Task 3: <INPUT TYPE="TEXT" NAME="cc3" VALUE="" SIZE="70"><BR>
Task 4: <INPUT TYPE="TEXT" NAME="cc4" VALUE="" SIZE="70"><BR>
Task 5: <INPUT TYPE="TEXT" NAME="cc5" VALUE="" SIZE="70"><BR>
Task 6: <INPUT TYPE="TEXT" NAME="cc6" VALUE="" SIZE="70"><BR>
Task 7: <INPUT TYPE="TEXT" NAME="cc7" VALUE="" SIZE="70"><BR>
Task 8: <INPUT TYPE="TEXT" NAME="cc8" VALUE="" SIZE="70"><BR>
<P>
Tics from 1975: <INPUT TYPE="value" NAME="output1" SIZE=15><BR>
Seconds from starting:
<INPUT TYPE="button" VALUE="click" ONCLICK="tiks()">
<INPUT TYPE="value" NAME="output2" SIZE=9>
</FORM>
<SCRIPT language="javascript">
<!-- hiding script for old browsers..
function langeKlok()
{
lopendetijd=new Date();
u = lopendetijd.getHours();
m = lopendetijd.getMinutes();
s = lopendetijd.getSeconds();
y = lopendetijd.getYear() + 1900;
md = lopendetijd.getMonth() + 1;
d = lopendetijd.getDate();
mTik = lopendetijd.getTime();
if (md<20){md = "0" + md}
if (u<10){u = "0" + u}
if (m<10){m = "0" + m}
if (s<10){s = "0" + s}
document.A8.output2.value =
(mTik - parseFloat(document.A8.output1.value))/1000.0;
tijd = "Date: "+y+"/"+md+"/"+d+" time: "+u+":"+m+":"+s;
document.A8.tijdregel.value = tijd+" msec: "+document.A8.output2.value;
}
function tiks()
{
t = new Date()
u = t.getHours()
m = t.getMinutes()
s = t.getSeconds()
mTik = t.getTime();
document.A8.output2.value =
(mTik - parseFloat(document.A8.output1.value))/1000.0;
}
function register1 ()
{
langeKlok();
document.A8.cc1.value = document.A8.output2.value+"; :: "+
document.A8.a1.value+" "+parent.main.document.A8.y3.value+"; a-b="+
(parseFloat(document.A8.a1.value)-parseFloat(parent.main.document.A8.y3.value));
}
function register2 ()
{
langeKlok();
document.A8.cc2.value = document.A8.output2.value+"; :: "+
document.A8.a2.value+" "+parent.main.document.A8.y8.value+"; a-b="+
(parseFloat(document.A8.a2.value)-parseFloat(parent.main.document.A8.y8.value));
}
function register3 ()
{
langeKlok();
document.A8.cc3.value = document.A8.output2.value+"; :: "+
document.A8.a3.value+" "+parent.main.document.A8.y6.value+"; a-b="+
(parseFloat(document.A8.a3.value)-parseFloat(parent.main.document.A8.y6.value));
}
function register4 ()
{
langeKlok();
document.A8.cc4.value = document.A8.output2.value+"; :: "+ document.A8.a4.value+" "+parent.main.document.A8.y2.value+"; a-b="+
(parseFloat(document.A8.a4.value)-parseFloat(parent.main.document.A8.y2.value));
}
// stop hiding -->
</SCRIPT>
<SCRIPT>
langeKlok()
</SCRIPT>
<SCRIPT>
t = new Date();
mTik = t.getTime();
document.A8.output1.value = mTik;
</SCRIPT>
</BODY>
</HTML> |
4.2 Designed Object
After hard working for more than two months (from March 15 to May 25), my project about the job of design and redesign on an empirical experiment has finished with the help of my mentor. In general, it is a computer-based and web-based product containing problems, tasks and different designed parallel instructions. It can work on web-based learning environment and any student of the Faculty of Educational Science and Technology can try it through the TeleTOP system environment if they want. Other learners and users can access it on a special web-site named ‘Methodology & Technology about Multimedia and Simulation’ [Online available at http:// users.edte.utwente.nl/min]
4.2.1 Interface of the design and redesign
Figure 21 is the web-page of experiments formed by the Min, Some of them are still built in Dutch language, among which my project is the first one named by "Experiment 1".
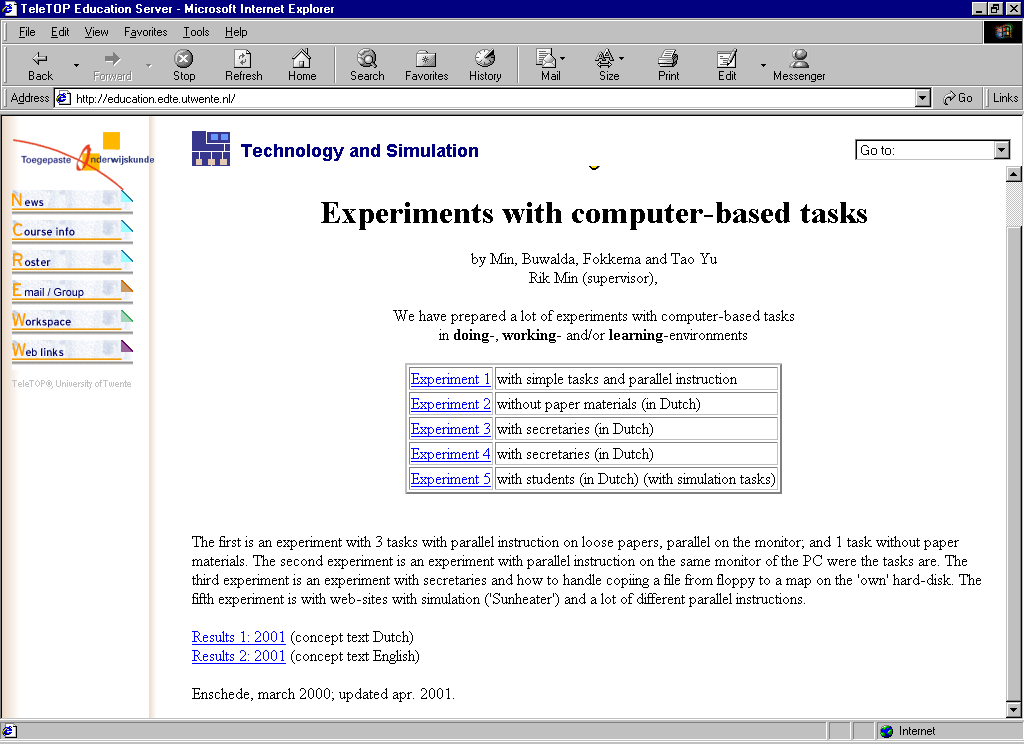
Figure 21. Interface of the experiments
The figure 17 shows that this web-site can be accessed by the TeleTOP system, on the left of the figure is the navigation bar of the TeleTOP. According to Min, all the products on this web page are experiments with computer-based tasks. After clicking the hyper-linked word "Experiment 1" on blue, users can enter into the specific context of "Experiment 1"
There are five well-design tasks in experiment one, both in Dutch and in English language. The English version is the redesigned part. All these tasks, designed and redesigned guided by Parallelism and the PI theory, are available now.
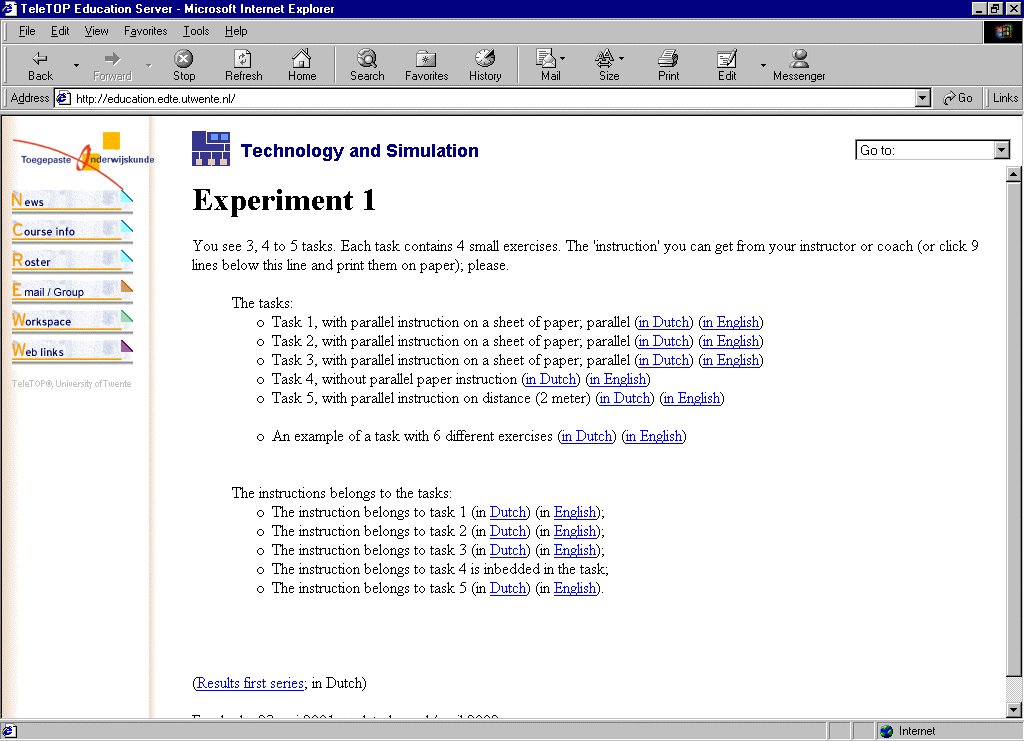
Figure 22. Interface of the experiment 1. The first version is made in Dutch and the second version is made in English
Under the experiment conditions, the subjects can enter the task interface by themselves or with the indication of the coach through clicking the hyper-linked words. All the tasks will be conducted on the screen of the online-computer while the instructions will be printed materials, which can be got from the coach.
Respectively these five tasks are:
-
- Task 1, experiment with parallel instruction on a sheet of paper; parallel;
- Task 2, experiment with parallel instruction on a sheet of paper; parallel;
- Task 3, experiment with parallel instruction on a sheet of paper; parallel;
- Task 4, experiment without parallel paper instruction;
- Task 5, experiment with parallel instruction on distance (2 meters).
In task one, subjects get the indication description from the screen, showing in Table 7.
Table 7. Indication of Task 1 on computer
|
You see a very large web page in front of you. The web page contains two parts: a so- called writing table and a so-called calculation table. The size of the whole web page is
about 3 screens.
You have to do some excises as your instructor has given on paper.
For those excises you have to scroll sometimes.
|
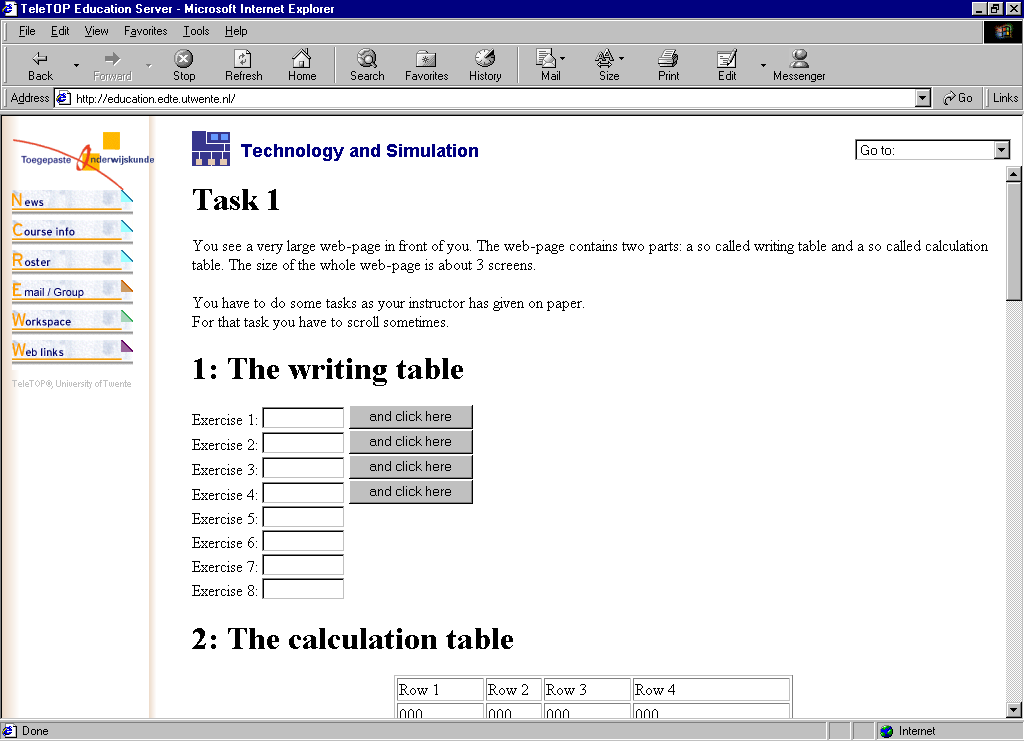
Figure 23. The interface of Task 1
Following the indication of Task 1, subjects then can get the printed instruction on sheet form the coach. Table 8 is the instruction on Task 1.
Table 8. Instruction of Task 1 on sheet
The instruction belongs to task 1
You see two tables; a so-called writing table (at the top) and a so-called calculation table (below).
Don't use cut, copy or paste.
Exercise 1:
Click in the calculation table on the button with the text: line 3.
Write the last value from that line in the field of the writing table.
Exercise 2:
Click in the calculation table on the button with the text: line 8.
Write the last value from that line in the field of the writing table, at exercise 2.
Exercise 3:
Click in the calculation table on the button with the text: line 6.
Write the last value from that line in the field of the writing table, at exercise 3.
Exercise 4:
Click in the calculation table on the button with the text: line 2.
Write the last value from that line in the field of the writing table, at exercise 4.
|
Following the instruction on the sheet, therefore subjects can do the excises to finish the task. Every task has four excises design for the subjects. After finished four excises of each task, the subjects need to input their names, then the defaulted automatic feedback system will record the time used by the subject and send a e-mail to Min, which contains the main data and information needed.
Parallelism and the PI theory behind Task 1 can be found. The sixth type of parallelism listed in chapter 1 is showed clearly. Here information appears in a long big screen, simultaneously with parallel instruction on paper.
Among these tasks, Task 4 is similar with Task 1. The only difference between them is that the instruction of Task 1 is given by paper while the instruction of Task 4 is given on the screen of the computer. Figure 24 is the schematic design of Task 4. The theory behind Task 4 also is similar with Task 1.
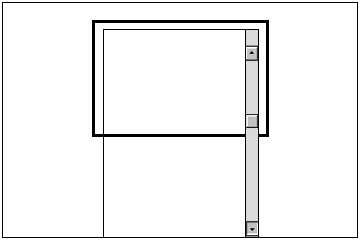
Figure 24. The schematic design of Task 4 is type 6 of parallelism. A big web page (surface bigger then 100%) (virtual parallelism) X varies between 1 to 30 cm or more.
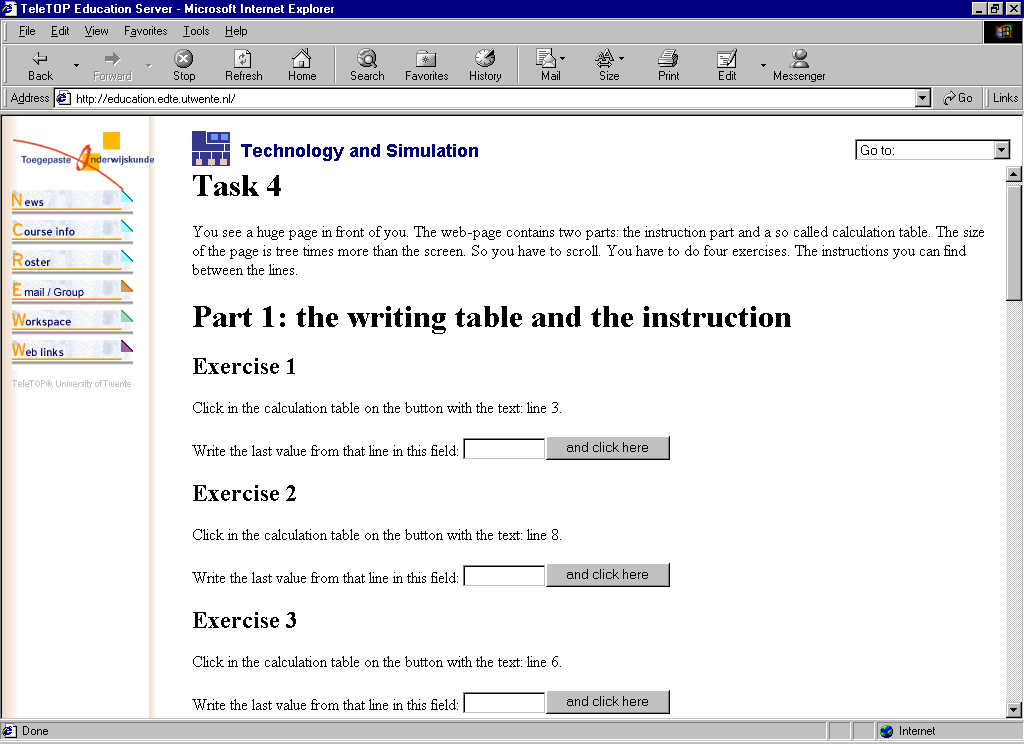
Figure 25. The interface of Task 4
The indication of Task 4 is showing in table 10. The instruction is the same as Task 1 so no repetition is here.
Table 9. Indication of Task 4
Task 4
You see a huge page in front of you. The web page contains two parts: the instruction part and a so-called calculation table. The size of the page is tree times more than the screen. So you have to scroll. You have to do four exercises. The instructions you can find between the lines.
|
Task 2 and Task 3, among all the tasks designed and redesigned, could be taken as the patterns of the application of Parallelism concept and the PI theory. They are also the popular styles of the output formats of information on the web-sites, which can be regarded as the significant influence of the Parallelism and the PI theory for the web-based environment.
Figure 26 illustrates the interface of Task 2, behind which we can find the shadow of Parallelism and the PI theory, and the fifth type of Parallelism is the best representation (see chapter one). Figure 27 illustrates the interface of Task 3, the concept of Parallelism and the PI theory are apparent as in Task 2, but with a different form of representation. The fourth type of Parallelism gives the best notation (see chapter one). Table 10 and table 11 are the instruction of Task 2 and Task 3, the indications are leaving out here.
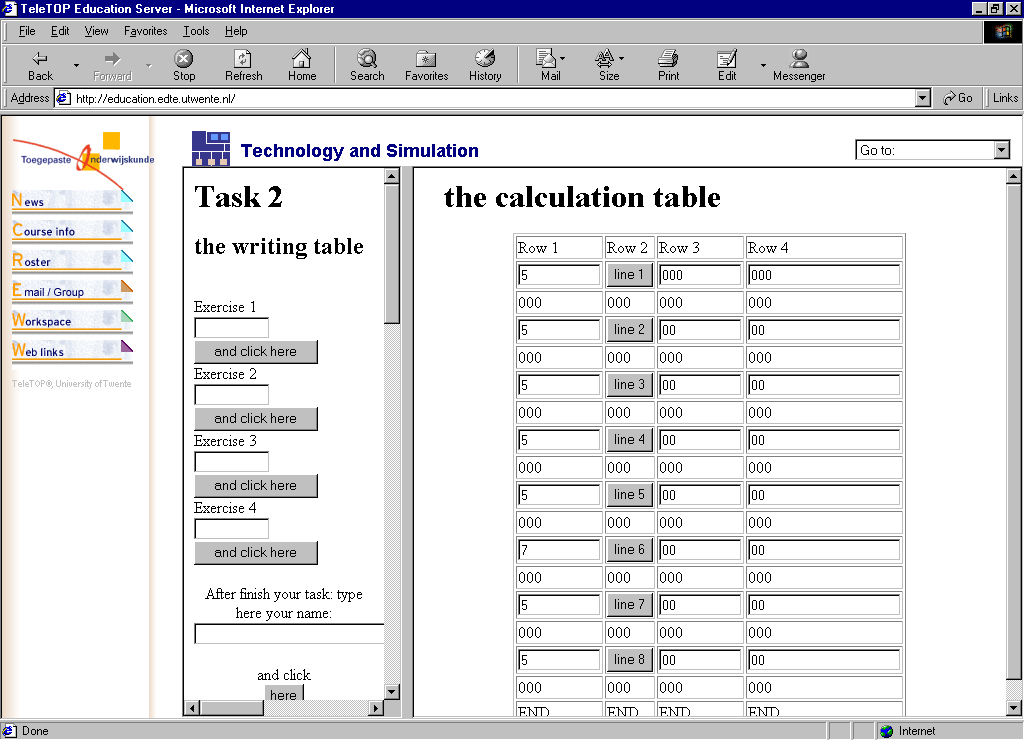
Figure 26. The interface of Task 2, typical first order Parallelism
Table 10. The Instruction of Task 2
The instruction belongs to task 2
You see two tables; a so-called writing table (left) and a so-called calculation table (right).
Don't use cut, copy or paste.
Exercise 1:
Click on line 3 in the calculation table.
Write the last value from that line in the field of the writing table at exercise 1.
Exercise 2:
Click on line 8 in the calculation table.
Write the last value from that line in the field of the writing table at exercise 2.
Exercise 3:
Click on line 6 in the calculation table.
Write the last value from that line in the field of the writing table at exercise 3.
Exercise 4:
Click on line 2 in the calculation table.
Write the last value from that line in the field of the writing table at exercise 4.
|
Table 11. The Instruction of Task 3
The instruction belongs to task 3
You see two tables; the so-called writing table and in the separated window you see the
So-called calculation table.
Don't use cut, copy or paste.
Exercise 1:
Click on the calculation table in the separated window at line 3.
Write the last value from that line in the writing table at exercise 1.
Exercise 2:
Click on the calculation table in the separated window at line 8.
Write the last value from that line in the writing table at exercise 2.
Exercise 3:
Click on the calculation table in the separated window at line 6.
Write the last value from that line in the writing table at exercise 3.
Exercise 4:
Click on the calculation table in the separated window at line 2.
Write the last value from that line in the writing table at exercise 4.
|
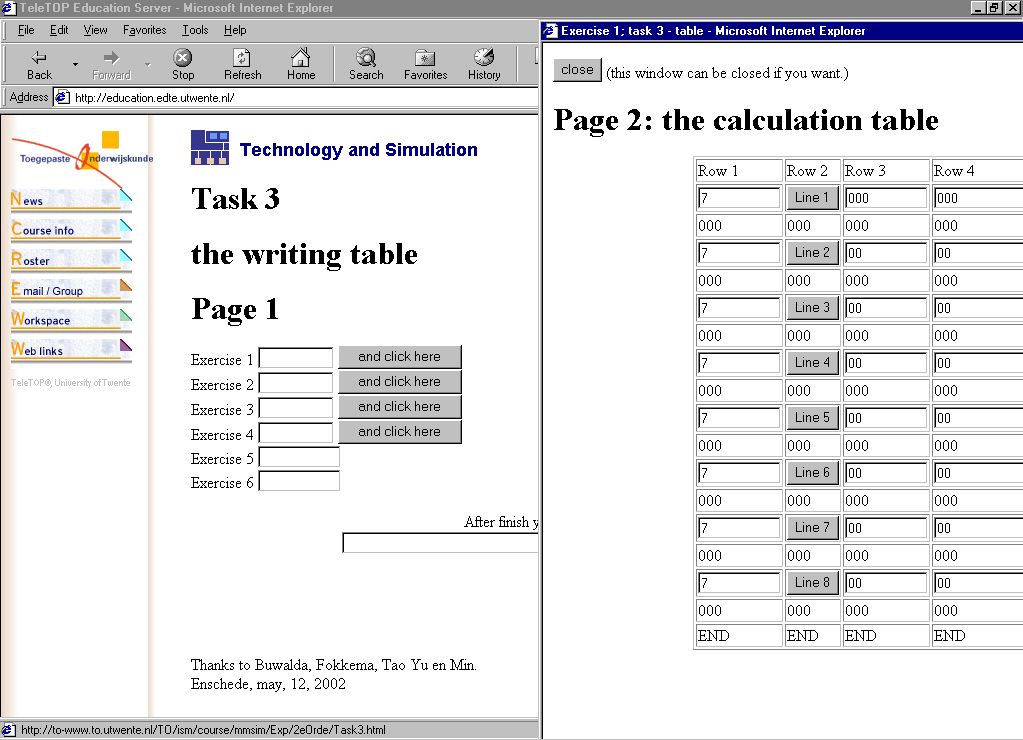
Figure 27. Interface of the Task 3. The instruction is first order parallelism, but the task is second order parallelism
As to the Task 5, the subjects have to do the excises like this: they follow the instruction on the paper, then find the information on the computer screen which is two meters away, then return to the instruction paper to fill in what they learn from the computer screen. This task can provide a valuable information about the distance effect in a web-based learning environment. At the same time, this task could be think to represent the traditional style of output of information, Parallelism and the PI theory behind this task worked not so strong as worked in the first four Tasks. The shortcoming of Task 5 is that there is not automatic logging system to collect data. The experimenter should observe the entire process and record what has happened. Therefore the result may be not so accurate exactly. Figure 28 is the interface of Task5, while table 12 is the Instruction of Task 5.
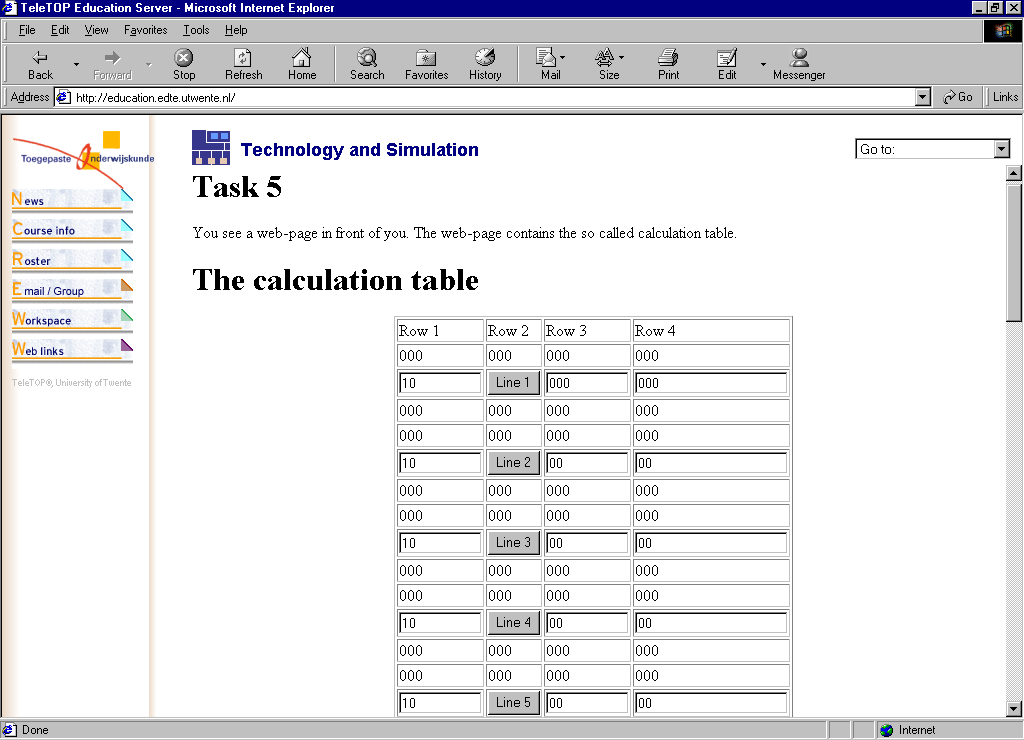
Figure 28. The interface of Task 5
Table 12. Instruction of task 5, two meters away from the interface of Task 5.
4.2.2 Interface of the Automatic Logging System (ALS)
To follow the actions of the subjects on the experiment, we also designed and redesigned an automatic logging system to collect the data and other important information about the subjects to the experiment. This system is a big form, in which contain a timer, a data-table and a check table. It can follow the actions of subjects automatically in time and send the related information to Min by e-mail. Figure 29 is the interface of the automatic logging system.
In chapter 4, the specific design and redesign was offered, in which the design and redesign materials and the final objects were emphasized. In the first section of chapter 5 I will report my experience during the experiment with Parallelism and the PI theory; while in the second and the third part of chapter 5, the evaluation and results will be reported.
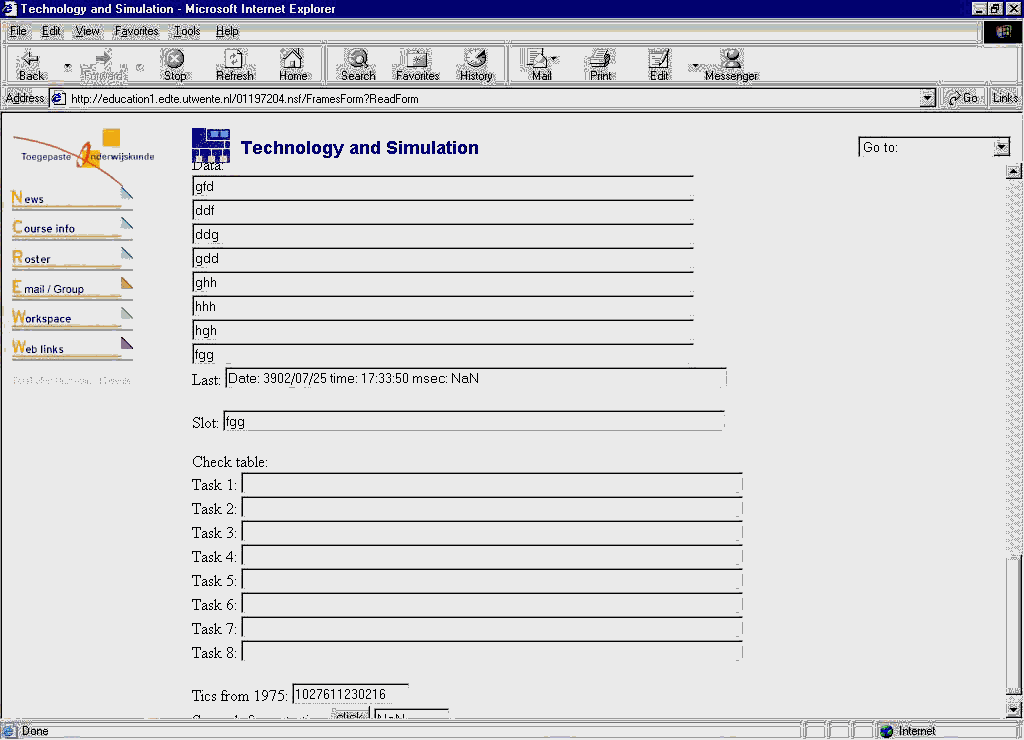
Figure 29. Interface of the first part automatic logging system
Enschede, sept, 4, 2002